How to Give Access in Amplenote: A Step-by-Step Guide with Best Practices
When working with note-taking apps, the ability to share information securely and efficiently is often just as important as creating it. In Amplenote, users may need to give access to colleagues, clients, or collaborators for several reasons. A student might share research notes with a study group, a manager may want to provide a project brief to their team, or a writer could publish a draft for an editor’s review.
Unlike some tools such as Obsidian, which encourage endless customisation and can lead to setup fatigue, Amplenote is built with simplicity and productivity in mind. This is especially visible in how it handles note sharing. Instead of overwhelming users with unnecessary complexity, Amplenote makes it straightforward to decide who can see, comment, or edit your notes.
Learning how to manage these settings properly ensures smooth collaboration without compromising security.
Table of Contents
Step-by-Step Guide: How to Give Access in Amplenote
The process of granting access in Amplenote is designed to be intuitive. Here is a detailed walkthrough of how it works, along with recommendations for when each option should be used.
Step 1: Open the Note You Want to Share
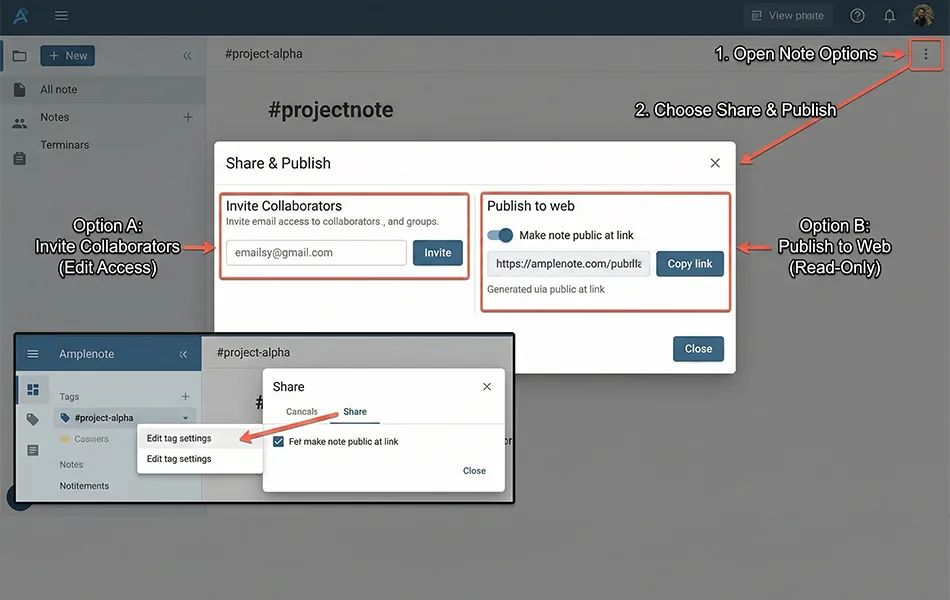
The first step is as simple as locating the note that needs to be shared. After logging into Amplenote on desktop or mobile, open the specific note. In the top-right corner of the note window, users will notice a “Share” icon. This button acts as the gateway to all sharing and permission settings.
Step 2: Generate a Shareable Link
Clicking the share option brings up a panel that allows you to publish the note. By toggling the “Publish note” option, Amplenote automatically generates a unique link. This link can be copied and sent to others by email, messaging apps, or project management platforms.
This method is ideal for quick sharing. For example, if a teacher wants to distribute lecture notes to a class, publishing the note and sharing the link can save time compared to inviting students one by one.
Step 3: Adjust Access Permissions
After generating the link, the user must decide the level of access others will have. Amplenote provides options to make the note public or private, and there is also the ability to add password protection for greater control.
A publicly available link can be useful for sharing content such as articles or project documentation with a wide audience. However, for confidential material, enabling password protection ensures that only authorised recipients can view the note.
Step 4: Invite Specific Users
If the goal is not wide distribution but controlled collaboration, Amplenote allows inviting individuals by entering their email addresses directly. Each person can be assigned a role with defined permissions. Once the invitations are sent, recipients will receive an email notification with instructions to access the shared note.
This option is highly practical for small teams. A project manager, for instance, can invite their team members to edit a note while restricting clients to read-only access. This way, internal collaboration happens smoothly without exposing sensitive drafts to external parties.
Step 5: Manage or Revoke Access
Access management does not end at the point of sharing. Users retain complete control and can revisit the Share menu at any time. Here, permissions can be updated, users can be removed, or the public link can be disabled entirely.
This flexibility is crucial in dynamic projects. If a contractor’s role ends, their access can be revoked immediately. If a document moves from drafting to final approval, permissions can be switched from “edit” to “read-only.” Amplenote ensures that the user always has the final say.
Different Access Levels Explained
Amplenote offers several access levels, each serving a different purpose. Understanding these levels is key to avoiding unnecessary risks while still enabling collaboration.
Read-Only Access
When a note is shared as read-only, recipients can view the content but cannot make changes. This is the safest way to distribute information that must remain intact. For example, a consultant could share a project roadmap with a client in read-only mode to prevent unintentional edits.
Comment-Only Access
Comment-only access allows recipients to suggest changes or leave remarks without altering the core content. This strikes a balance between collaboration and content protection. An editor reviewing a draft or a supervisor giving feedback on a report would find this level ideal.
Edit Access
Full editing rights enable collaborators to modify the note directly. While this level is powerful, it should be granted selectively. Teams working together on brainstorming sessions, meeting notes, or shared research documents will benefit from edit access. However, unrestricted editing can be risky if too many people are involved.
Password-Protected Access
For sensitive material, Amplenote allows users to lock a note with a password. This adds an extra layer of security by ensuring that even if the link is accidentally shared further, only those with the password can view the note. This is recommended when handling confidential documents such as client proposals, contracts, or academic research data.
Public Publishing
Some notes are meant to be openly accessible. Amplenote offers a public publishing option that generates a permanent URL for anyone to access without logging in. This is perfect for sharing blog posts, guides, or documentation. However, users must be cautious to ensure no sensitive information is published accidentally.
Best Practices & Security Tips
The convenience of sharing notes should never come at the expense of security. Following best practices ensures smooth collaboration while keeping information safe.
Use Password Protection for Sensitive Notes
Whenever confidential information is involved, a strong password should be set. This prevents unauthorised users from opening a note even if the link leaks.
Review Permissions Regularly
Projects evolve, and so do the people involved in them. A quarterly or monthly audit of permissions ensures that outdated collaborators do not retain unnecessary access.
Apply the Principle of Least Privilege
Always grant the minimum necessary access. If a user only needs to read information, avoid giving them edit rights. This reduces the chance of accidental changes or security breaches.
Avoid Public Links for Private Content
Public publishing is excellent for open sharing but should never be used for sensitive notes. Instead, opt for controlled sharing with either password protection or email invitations.
Rely on Amplenote’s Built-In Security Features
Amplenote supports end-to-end encryption and allows individual notes to be password-protected. Users should take advantage of these safeguards to ensure their notes are not vulnerable to external threats.
Common Issues & Fixes
Even with a well-designed system, some challenges may arise. Here are the most common issues encountered when giving access in Amplenote and their solutions.
Problem: Recipient Cannot Open the Link
Sometimes recipients report that a link does not work. This often happens if the note is not set to “public” or if the link has been revoked. Revisit the Share menu and confirm that the sharing toggle is still active.
Problem: User Cannot Edit Despite Being Invited
If a collaborator cannot edit, it usually means they were mistakenly given read-only access. Double-check their assigned role in the Share menu and update it to “edit.”
Problem: Password Does Not Work
A common mistake is sharing an outdated or mistyped password. Reset the password in the note’s sharing settings and communicate it securely to the intended recipients.
Problem: Updates Are Not Visible to Others
If recipients cannot see the latest changes, syncing may not be complete. Amplenote generally syncs automatically across devices, but ensuring a stable internet connection will prevent delays.
Problem: Accidental Public Sharing
On occasion, a user may accidentally publish a private note publicly. If this occurs, the best action is to immediately disable the public link and re-share the note through secure, restricted access.
Get Access
Giving access in Amplenote is not just about distributing information—it is about doing so with the right balance of security and usability. By following the step-by-step guide, understanding the access levels, and applying best practices, users can collaborate confidently without risking their data.
Amplenote sets itself apart by avoiding unnecessary complexity and focusing on productivity and control. Whether a user is publishing a note for a wide audience or collaborating with a small team, Amplenote’s sharing tools provide the flexibility to do so securely.
For those who have found themselves overwhelmed by apps that prioritise customisation over focus, Amplenote offers a refreshing alternative: a tool that allows users to spend less time managing their setup and more time getting work done.
Partner with our Digital Marketing Agency
Ask Engage Coders to create a comprehensive and inclusive digital marketing plan that takes your business to new heights.
Contact Us
FAQs
Yes. Amplenote combines note-taking, task management, and scheduling in one platform. Its sharing options make it suitable for both personal productivity and team collaboration.
Amplenote supports end-to-end encryption and offers password protection for shared notes. This makes it secure enough for both personal and professional use.
Not always. If a note is published publicly, anyone with the link can open it. However, for editing access, users must log in with an Amplenote account.
Yes. Owners can revisit the Share menu to update permissions or revoke access entirely. These changes take effect immediately.
There is no strict limit, but best practice is to avoid sharing with unnecessary users. Collaboration remains most effective when access is managed carefully.
Yes, you can share notes in Amplenote securely by inviting specific users via email, which avoids generating an open Amplenote public link that anyone could access.
Specific Amplenote permissions allow you to distinguish roles; comment-only lets users leave feedback, while edit access is designed for full, real-time Amplenote collaboration.
You can instantly revoke permissions via the share menu, which is a critical feature for maintaining Amplenote security when a team member leaves or a project concludes.
Yes, adding a password ensures high-level Amplenote security, allowing you to share notes with peace of mind even if the link is distributed to others.
Effective Amplenote collaboration relies on assigning correct roles to each user and regularly auditing your shared lists to ensure no unnecessary public link remains active.


